Everything you need to get started and make the most of our app.
Before you can start using Claimlane Integration, you need to have a Claimlane account. If you don't have one yet, you can sign up for an account at claimlane.com.
Once you have your Claimlane account, you'll need to generate an API key to connect your account to Business Central. You can request one through your Claimlane contact. Your contact can also help you set up Claimlane so the integration works properly.
Internal and Flow tags are used to map data between Business Central and Claimlane. A rule for most of these tags in Claimlane is, that the Technical Label is what is the link between Claimlane and BC. For B2B, you create the tags this way:

Above tags are for B2B returns and claims. To setup tags for B2C, go to "Manage Company" - "Data Sources", click the 3 dots next to the data source you wish to edit and click "Configure". Click the "General Tags" button in the menu. Create the tags that you need to use. Only claim and return reasons are relevant for this integration.
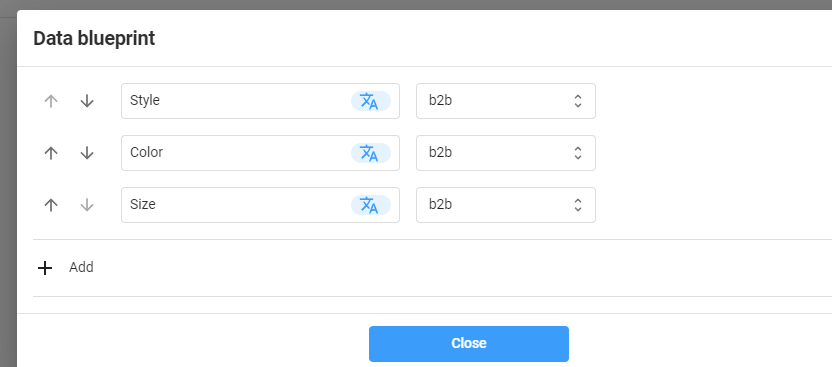
Product data is used to map products between Business Central and Claimlane. To create a product data blueprint:
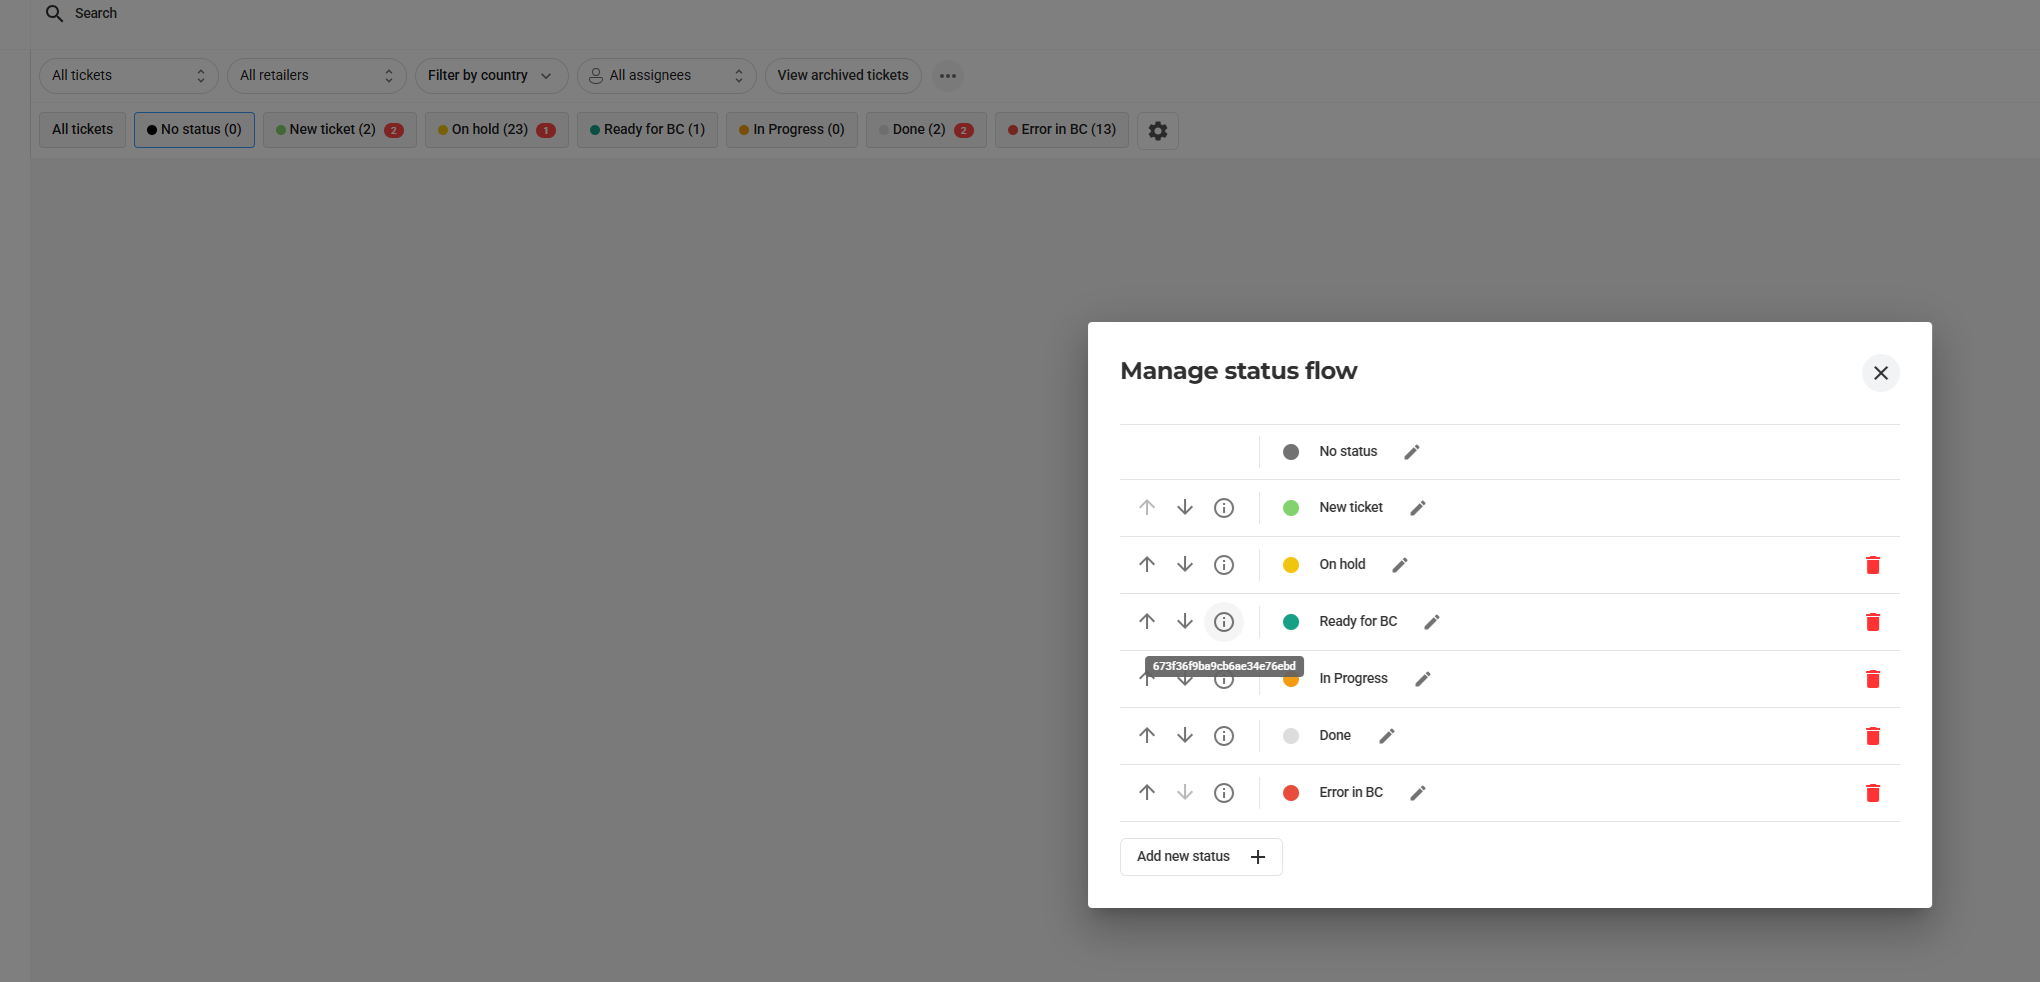
Statuses are used to track the progress of a return or claim. To create statuses:
Follow these steps to install Claimlane Integration in Microsoft Dynamics 365 Business Central.
In Business Central, search for Extension Marketplace. Once Marketplace has opened, search for "Claimlane Integration" and follow the on-screen setup guide.
You can also install the extension directly from the Microsoft AppSource.
Customize Claimlane Integration to match your business processes and requirements.
We recommend that you use the Assisted Setup wizard to configure Claimlane Integration in less than 10 minutes. To access the wizard, go to Assisted Setup in Business Central and follow the steps. See below for setup field definitions.
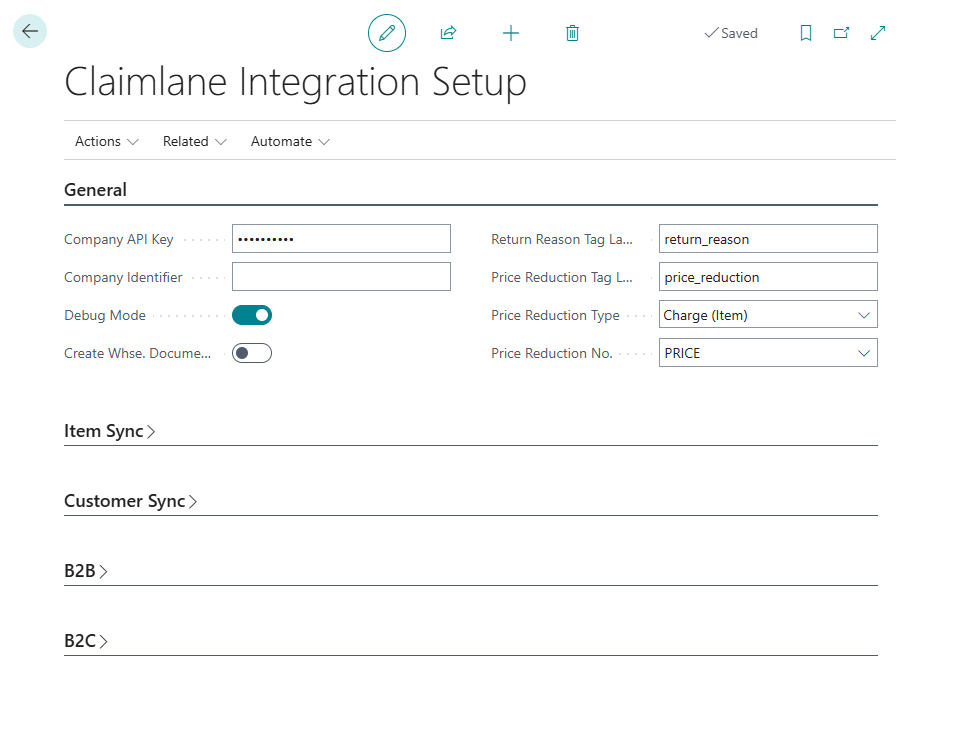
Claimlane API Key
Your Claimlane API key is required to connect your Claimlane account to Business Central. You can find your API key in your Claimlane account settings or request one through your Claimlane contact.
Company Identifier
The identifier for the company. You can use this to differentiate your tickets between multiple companies, if you do not have a Claimlane instance per company. It is recommended to have one Claimlane instance per company, and therefore separate API keys.
Debug Mode
If set to Yes, the requests and response objects will be saved in the Claimlane Commucation Log. This is useful for debugging purposes.
Create Whse. Documents
If set to Yes, the system will create warehouse documents for return orders, if location requires receipt.
Return Reason Tag Label
Defines which tag to use to find return reason on the item. This is required in oreder for the integration to work.
Price Reduction Tag Label
Defines the tag to use to find price reduction on the item. This is optional.
Price Reduction Type
Defines the type of price reduction. Options are G/L Account, Charge (Item) and Item. It is recommended to use Charge (Item).
Price Reduction No.
Defines the no. of the price reduction chosen in the Type.

Enable Item Sync
Enables synchronization of items between BC and Claimlane.
Max Product Request Size
The maximum size of product data that can be uploaded to Claimlane per request. This is used to split up large product data sets into multiple requests.
Full Override Next Item Upload
If set to Yes, the system will override all item data in Claimlane in next item synchronization, deletinng all items first. Use this if you want a "clean slate" in Claimlane.
Brand Table No.
If multiple brands are used, this field defines which table is used to map brands to Claimlane.
Brand Item Field No.
If multiple brands are used, choose what field defines the brand on the item table. The field must be related to the table selected in "Brand Table No.". If you only have one brand, you can leave this field empty.
For additional setup, see "Item Sync. Filters" below.

Enable Customer Sync
Enables synchronization of customers between BC and Claimlane.
Max Invite Request Size
The maximum size of customer invite data that can be uploaded to Claimlane per request. This is used to split up large invite data sets into multiple requests.
B2B Email Field
Select what field on the customer the email address should be copied from when creating Claimlane Retailers. The value can be changed in the Claimlane Retailer list.
Enable Invoice Sync
Enables synchronization of invoices between BC and Claimlane Data Sources.
Use Base Unit
If set to Yes, the system will use the base unit of measure for the item when syncing invoices. If set to No, the system will use the unit of measure on the invoice line.
Max Invoice Request Size
The maximum size of invoice data that can be uploaded to Claimlane per request. This is used to split up large invoice data sets into multiple requests.
For additional setup, see "Sales Invoice Filters" below.
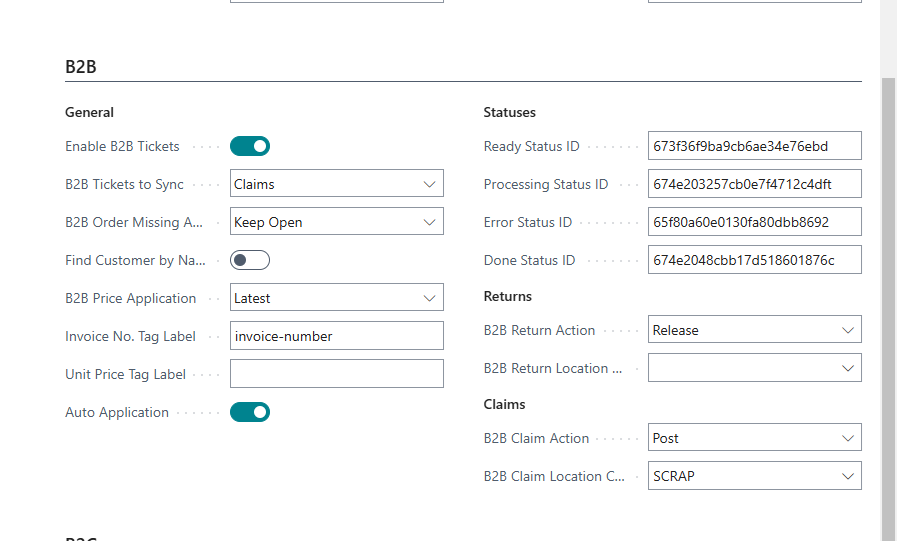
Enable B2B Tickets
Enables sync of B2B tickets.
B2B Tickets to Sync
Choose whether to sync claims, returns or both types of tickets.
B2B Order Missing Action
Defines what should be done if no related invoice can be found in the system.
Find Customer by Name
If set to true, system will attempt to find a customer by name if no customer number is found in data from Claimlane.
B2B Price Application
Defines what should be done if no price can be found from the matching invoice.
First: Uses unit price from the first found invoice line on the customer. Latest: Uses unit price from the latest invoice line.
Invoice No. Tag Label
Defines which tag to use to find item price based on Invoice No. If not set or not filled, the system will fallback to order no. logic. Has to be invoice-number if invoice flow is enabled.
Unit Price Tag Label
Defines which tag to use to find unit price on the item. If Unit Price is set in Claimlanem, it will override price found in BC.
Auto Application
If set to true, the system will automatically try to apply the credit memo or return order to the customer ledger entry of the invoice.
Statuses
Defines the statuses used in Claimlane. The ID's are found in Claimlane settings.
B2B Return Action
Defines what should be done when a return order is created. Options are Do Nothing, Release, Send for Approval or Post. Recommended action is "Release".
B2B Return Location Code
Defines the location code to use when creating a return order. Will override default location code set on return reasons.
B2B Claim Action
Defines what should be done when a claim is created. Options are Do Nothing, Release, Send for Approval or Post. Recommended action is "Post". "Do Nothing" can be used in the beginning to check if everything is working as expected.
B2B Claim Location Code
Defines the location code to use when creating a claim. Will override default location code set on return reasons.
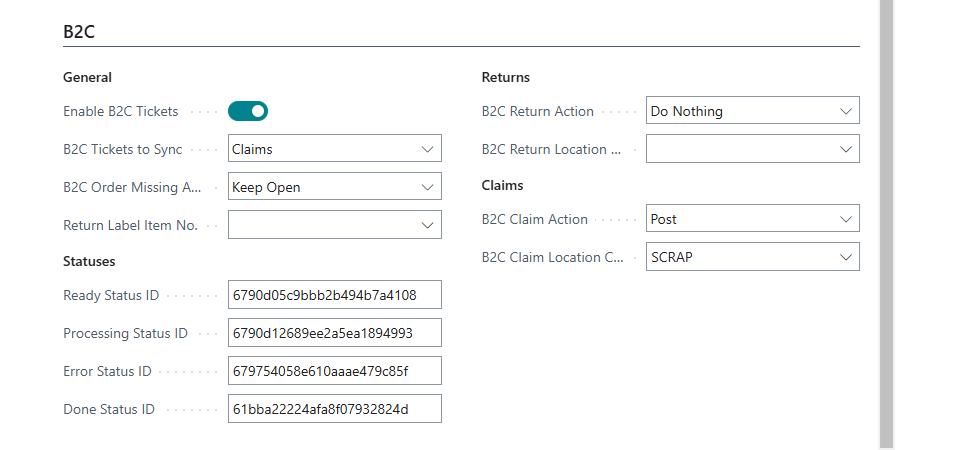
Enable B2C Tickets
Enables sync of B2C tickets.
B2C Tickets to Sync
Choose whether to sync claims, returns or both types of tickets.
B2C Order Missing Action
Defines what should be done if no related invoice can be found in the system.
Return Label Item No.
Defines the item number to use when creating a return label lines.
Statuses
Defines the statuses used in Claimlane. The ID's are found in Claimlane settings.
B2C Return Action
Defines what should be done when a return order is created. Options are Do Nothing, Release, Send for Approval or Post. Recommended action is "Release".
B2C Return Location Code
Defines the location code to use when creating a return order. Will override default location code set on return reasons.
B2C Claim Action
Defines what should be done when a claim is created. Options are Do Nothing, Release, Send for Approval or Post. Recommended action is "Post". "Do Nothing" can be used in the beginning to check if everything is working as expected.
B2C Claim Location Code
Defines the location code to use when creating a claim. Will override default location code set on return reasons.
There are a number additional setups needed depending on what integrations are enabled.
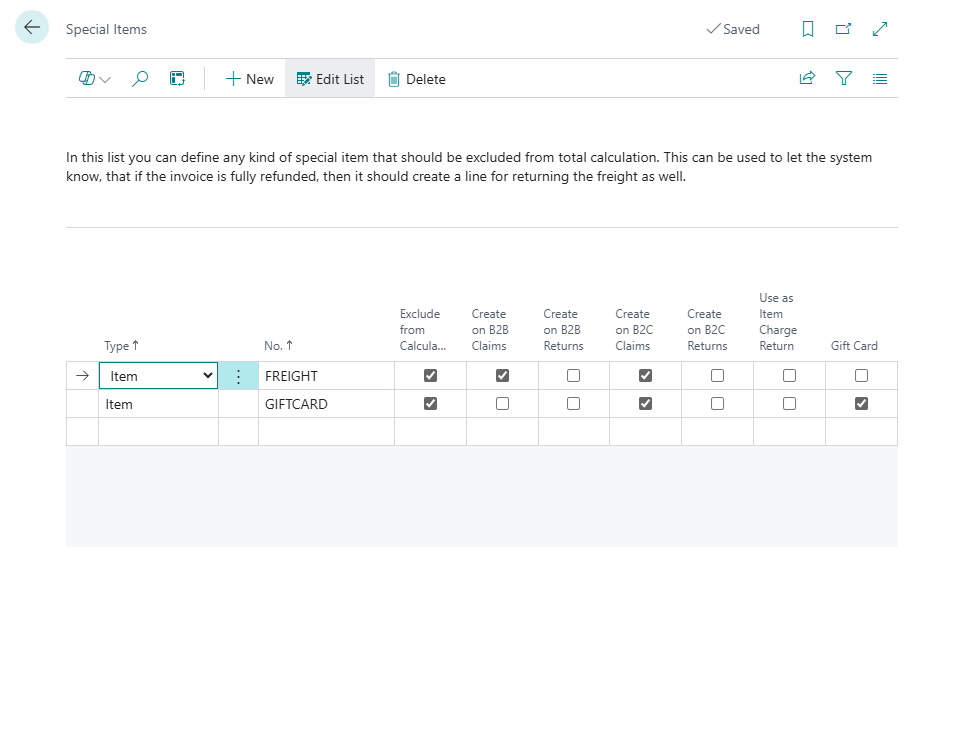
Special items are used to define items like freight and gift cards. The setup can be used to enable return/refund of freight if entire order is returned. For gift cards, the system will create a gift card line on the return order/credit memo, if a gift card is found on the original invoice. This it to make sure that gift card is correctly refunded.
Note that a returned gift card value is dependant on the value of the claim/return, however, the value cannot be above the original gift card amount.
Special items are located in Claimlane Integration Setup under "Related".
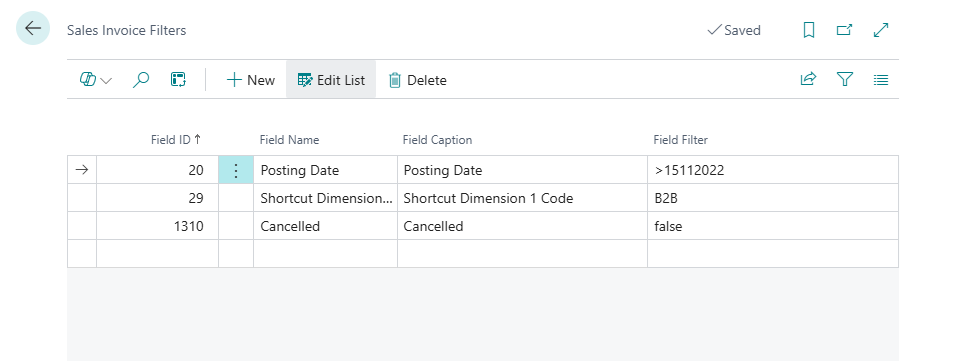
Sales invoice filters are used to filter what invoices should be synced to Claimlane (if "Enable Invoice Sync" is set to Yes). You might not want to sync all invoices, eg. only sync B2B invoices.
Sales Invoice Filters are located in Claimlane Integration Setup under "Related".
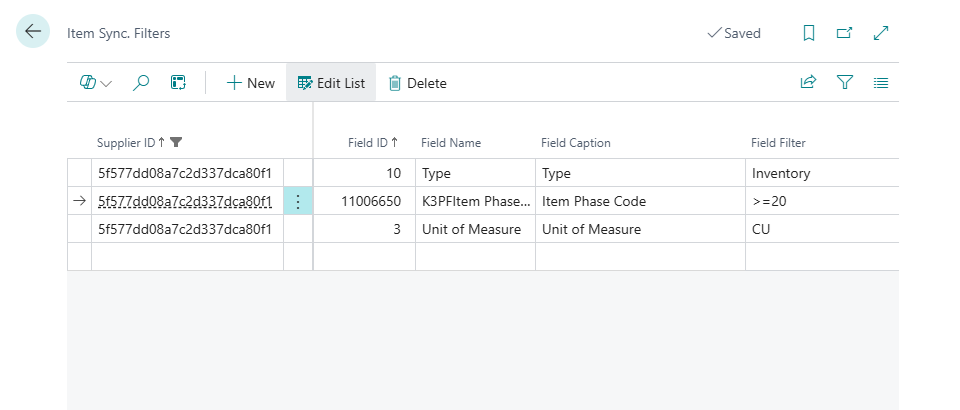
Item filters are used to filter what items should be synced to Claimlane (if "Enable Item Sync" is set to Yes). You might not want to sync all items, eg. only sync items with a certain brand, only PCS unit of measure, only active items etc.
Item Sync. Filters are located in Claimlane Suppliers as they are linked to each supplier.
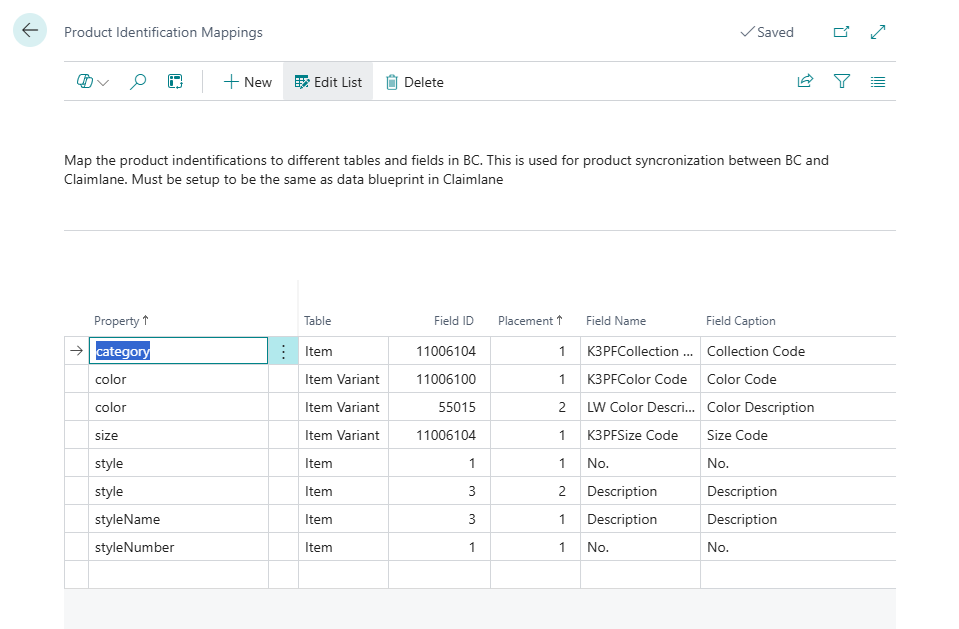
Product identification mapping is used to map product data between BC and Claimlane. This is used to map the product data blueprint in Claimlane to the item card in BC. The mapping is done by using the technical label of the tags in Claimlane and the field no. in BC.
Product Identification Mapping is located in Claimlane Brands (can be found by search or in Claimlane Suppliers).
Multiple fields can refer to the same property name by using Placement - they will be separated by a blank space. In this example "style" is a combination of the fields "No." and "Description" from the item table.
The data blueprint is downloaded when clicking "Get Suppliers" in Claimalne Integration Setup, along with list of suppliers and brands.
There are numerous events throughout the application to help your BC partner customize the extension if needed.
| Event Name | Object Name |
|---|---|
| OnAfterInsertB2CTicketHeader | TTU B2C Ticket Sync. Handler |
| OnBeforeInsertB2CTicketLine | TTU B2C Ticket Sync. Handler |
| OnAfterInsertB2CTicketLine | TTU B2C Ticket Sync. Handler |
| OnBeforeGetB2CTicketsHandleResponse | TTU B2C Ticket Sync. Handler |
| OnBeforeInsertB2CTicketLineDataSourceTags | TTU B2C Ticket Sync. Handler |
| OnBeforeGetItemByItemReferenceB2B | TTU Document Handler |
| OnBeforeModifyB2BSalesLineNew | TTU Document Handler |
| OnAfterModifyB2BSalesLineNew | TTU Document Handler |
| OnBeforeFindB2BPrice | TTU Document Handler |
| OnFindSalesPriceNoPriceApplicationFound | TTU Document Handler |
| OnAfterGetOriginalB2BPrice | TTU Document Handler |
| OnBeforeAddItemChargeAssignmentToSalesLine | TTU Document Handler |
| OnAfterAddItemChargeAssignmentToSalesLine | TTU Document Handler |
| OnBeforeGetB2BCustomer | TTU Document Handler |
| OnBeforeGetB2CCustomer | TTU Document Handler |
| OnAfterGetOriginalB2CPrice | TTU Document Handler |
| OnBeforeAddReturnLabelLine | TTU Document Handler |
| OnAfterAddReturnLabelLine | TTU Document Handler |
| OnBeforeFindB2CPrice | TTU Document Handler |
| OnBeforeModifyB2CSalesLine | TTU Document Handler |
| OnAfterModifyB2CSalesLine | TTU Document Handler |
| OnBeforeGetItemByItemReferenceB2C | TTU Document Handler |
| OnBeforeModifyB2CSalesHeader | TTU Document Handler |
| OnBeforeCheckCustomerBlocked | TTU Document Handler |
| OnBeforeModifyB2BSalesHeader | TTU Document Handler |
| OnAfterCreateDocumentFromB2BTicket | TTU Document Handler |
| OnAfterCreateDocumentFromB2CTicket | TTU Document Handler |
| OnBeforeAddItemObject | TTU Data Sync. Handler |
| OnBeforeAddProductIdentificationToItemObject | TTU Data Sync. Handler |
| OnBeforeAddDataToInvitesJson | TTU Data Sync. Handler |
| OnBeforeGetEmailAddress | TTU Data Sync. Handler |
| OnBeforeLoopCustomers | TTU Data Sync. Handler |
| OnBeforeSetSalesOrderNo | TTU Data Sync. Handler |
| OnBeforeSetExternalDocumentNo | TTU Data Sync. Handler |
| OnAfterInsertB2BTicketLine | TTU B2B Ticket Sync. Handler |
| OnBeforeGetB2BTicketsHandleResponse | TTU B2B Ticket Sync. Handler |
| OnBeforeInsertB2BTicketLine | TTU B2B Ticket Sync. Handler |
| OnBeforeInsertB2BTicketLineProductIdentification | TTU B2B Ticket Sync. Handler |
| OnBeforeInsertB2BTicketLineDataSourceTags | TTU B2B Ticket Sync. Handler |
| OnAfterInsertB2BTicketHeader | TTU B2B Ticket Sync. Handler |
| OnBeforeCheckFulleRefunded | TTU Toolbox |
| OnBeforeAddAdditionalRefundsToSalesHeader | TTU Toolbox |
| OnBeforeModifyAdditionalRefundsToSalesHeader | TTU Toolbox |
| OnAfterModifyAdditionalRefundsToSalesHeader | TTU Toolbox |
| OnBeforeModifyGiftCardLine | TTU Toolbox |
| OnAfterModifyGiftCardLine | TTU Toolbox |
| OnBeforeAddGiftCardsToSalesHeader | TTU Toolbox |
Eg. the following event can used to create matrix lines (if K3 Pebblestone is used):
[EventSubscriber(ObjectType::Codeunit, Codeunit::"TTU Document Handler", 'OnAfterModifyB2BSalesLine', '', false, false)]
local procedure OnAfterModifyB2BSalesLineNew(var SalesLine: Record "Sales Line"; var LineNo: Integer)
var
    K3PFSalesDocMgt: Codeunit "K3PF Sales Document Mgt.";
    SalesLine2: Record "Sales Line";
begin
    Clear(K3PFSalesDocMgt); SalesLine2 := SalesLine;
    K3PFSalesDocMgt.AssignToMatrixLine(SalesLine2);
    LineNo += 10000;
end;
Yes, the app is extendable through Event Publishers and Event Subscribers. Use event subscribers in your app to extend functionality. See the Events section for more info.
You can edit the tags at any time by logging into Claimlane and going to the Data Management section. Internal and flow tags are customizable. Make sure that technical labels match the labels in BC for proper integration.